


You're finally taking that well-deserved vacation when your phone buzzes again with another work email. The last thing you want to do is reply and get drawn back into work while you're on PTO.
This is where an out-of-office message can save the day (and your vacation), politely informing colleagues, clients, and any other incoming messages that you're currently unavailable to respond until you return to work. An out-of-office message (also called an OOO message or away message) is an automatic email reply that sends a pre-written response to anyone who emails you while you're away from work. In Microsoft Outlook, this feature is called "Automatic Replies" and lets you set a date range, write separate messages for internal and external contacts, and optionally block your calendar, so colleagues, clients, and anyone else who emails you know you're unavailable until you return.
Here are some of the top scenarios where an OOO reply comes in handy:
- Vacation
- Sick leave
- Maternity/paternity parental leave
- Business trip
- Conference/event
- Company-wide holidays
- Jury duty
- Bereavement leave
In this guide, we'll show you how to set an out-of-office message in Microsoft Outlook in 5 simple steps, with tips on how to craft the perfect OOO message.
Setting up your out-of-office message (step-by-step)
Wondering how to put an out-of-office message on Outlook? It takes about two minutes regardless of which version you're on. Open Automatic Replies, toggle it on, set your dates, write your message, and save. Here's the detailed walkthrough.
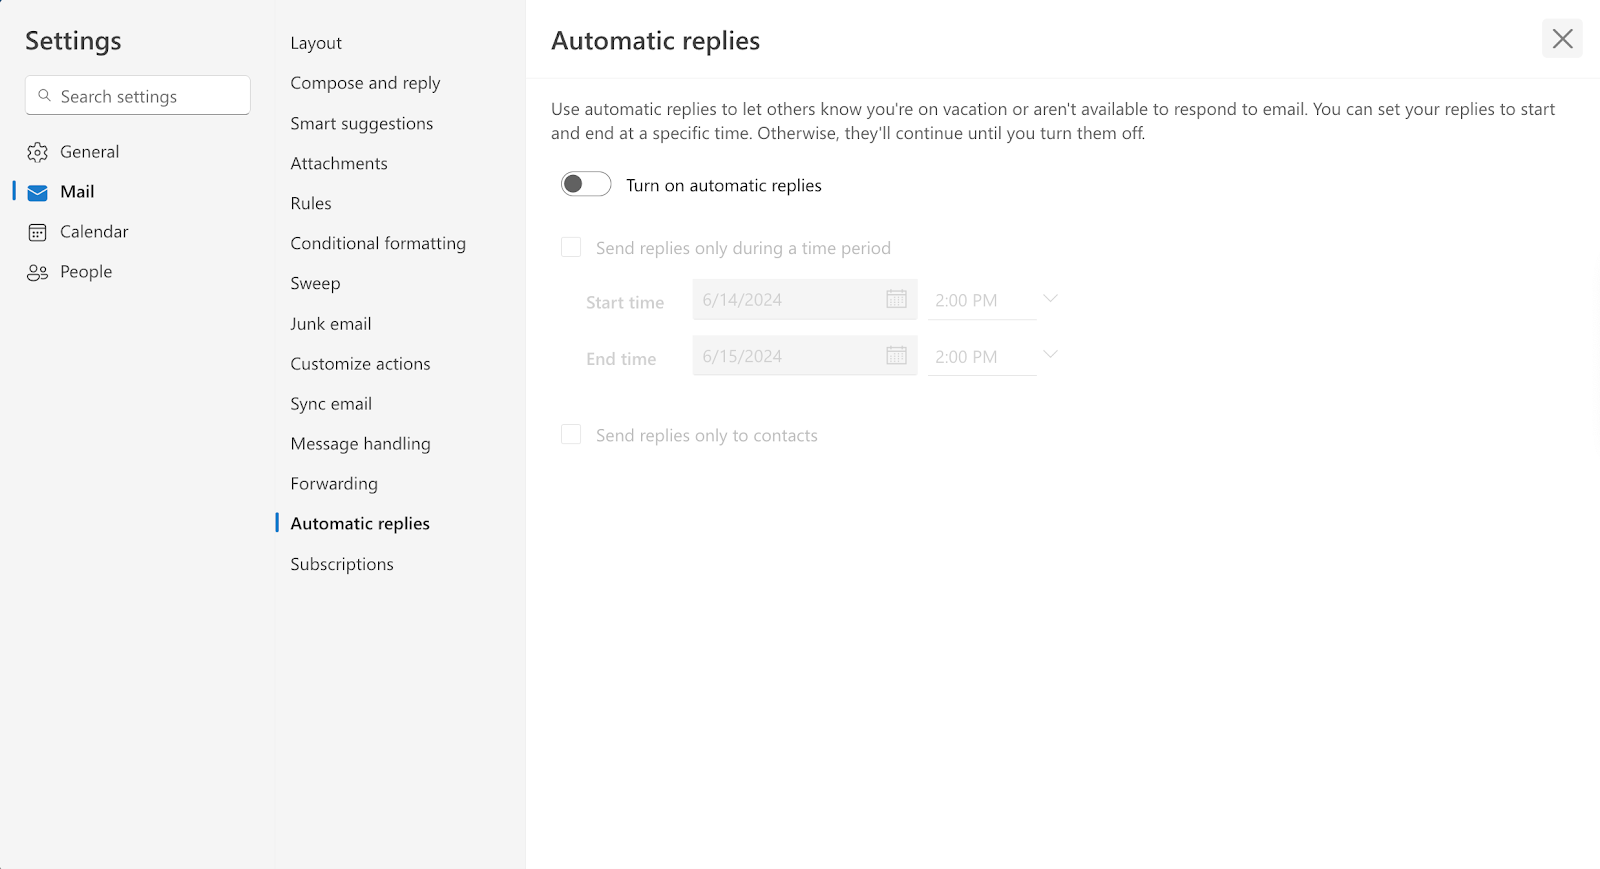
Step 1: Open Outlook & access Automatic Replies
The path to Automatic Replies depends on which version of Outlook you're using. Here's a quick-reference table:
More detail on each version:
- Classic Outlook desktop app (Windows)
- Click File > Automatic Replies (or Out of Office)
- If you don't see this option, it may be under Info
- Classic Outlook for Mac
- Click Tools > Automatic Replies in the toolbar
- Note: The toggle to switch back to legacy Outlook for Mac was removed in October 2025, and legacy Outlook for Mac will fully stop working against Exchange Online in October 2026. Over 95% of Mac users are now on New Outlook.
- New Outlook app (Windows/Mac)
- Click View tab > View settings > Accounts > Automatic Replies
- Outlook on the web (OWA / Microsoft 365)
- Click the gear icon (Settings) > Accounts > Automatic Replies
- Outlook mobile app (iOS/Android)
- Tap your profile icon > Settings gear icon > tap your mail account > Automatic Replies
Step 2: Turn on Automatic Replies & set the date range
- Toggle on Send automatic replies.
- Set the date range:
- Start time: Choose the date and time your absence begins.
- End time: Choose the date and time you expect to return (this will automatically turn off the message). If you don't set an end time, you must disable automatic replies manually.
Step 3: Craft your out-of-office message
- Be clear & concise: State that you're out of the office, your return date, whether you have email access, and if you're answering emails in some limited capacity.
- Provide alternate contact: If someone needs immediate assistance, provide an alternate contact person's name and email.
- Be professional, but friendly: Add a touch of personality if it aligns with your company culture.
- Avoid overly detailed information: Don't share personal details about your absence.
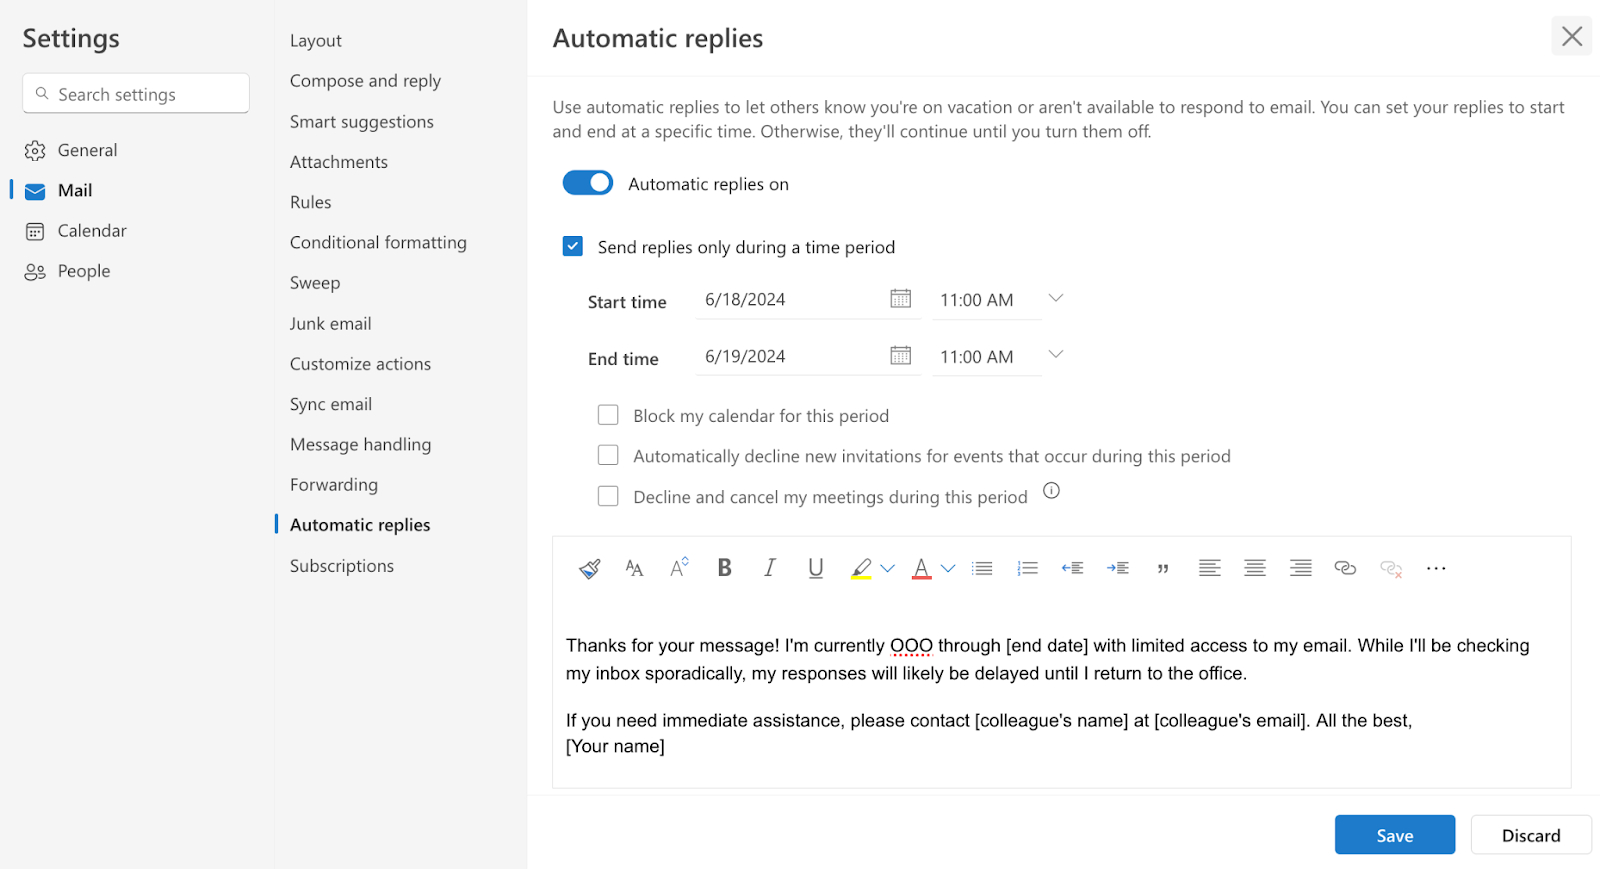
Example:
Step 4: Create a separate message for external recipients (optional)
- If you regularly communicate with clients, partners, or vendors, you may want a separate message.
- This message can be more formal and may not include an alternate contact within your company.
- Check the "Send replies outside my organization" box and craft your external message.
Step 5: Review & save your settings
- Double-check all dates, times, and contact information.
- Send a Test Message: Send an email to yourself from a different account to make sure the message is being delivered correctly.
- Click "OK" or "Save" to activate your out-of-office reply.
How to set out of office on your Outlook calendar
To mark your Outlook calendar as out of office, create an all-day event and set the "Show As" status to "Out of Office." Automatic replies handle your email, but if you're wondering how to show out of office on your Outlook calendar too, this step lets colleagues see your availability at a glance and prevents meeting conflicts during your absence.
Creating an out-of-office calendar event
- Open Outlook Calendar (desktop, web, or mobile).
- Click or tap to create a new event on the date(s) you'll be away.
- Set the event to All day (or set specific start/end times for partial-day OOO).
- In the Show As dropdown, select Out of Office.
- In New Outlook or Outlook on the web, look for the Status or Show as option in the event details.
- Title the event descriptively (e.g., "OOO: Vacation" or "Out of Office: Conference").
- (Optional) Add details in the event body, such as who to contact while you're away.
- Click Save.
When your calendar shows "Out of Office," anyone who tries to schedule a meeting during that time will see a conflict notification. This is especially useful for multi-day absences like vacations or parental leave, and it answers the common question of how to add out of office to your Outlook calendar without relying solely on auto-replies.
Making your OOO status visible to your team
- Set event visibility to Public (or the default) so that free/busy information is shared.
- If your organization uses shared calendars, the OOO block will appear automatically for anyone with access.
- For room and resource calendars, marking yourself as OOO helps scheduling assistants avoid double-booking.
Out-of-office auto-reply examples
Looking for out-of-office message examples you can copy and paste? Here are 9 ready-to-use OOO templates for every scenario, from vacation and sick leave to parental leave and client-facing replies. Customize the bracketed fields and you're done.
1. Standard out-of-office auto-reply
2. Vacation / PTO auto-reply
3. Humorous out-of-office message
4. Sick leave / short notice OOO
5. Maternity / paternity leave auto-reply
6. Conference or event (informative template)
7. Business trip
8. Company holiday / office closure
9. External / client-facing OOO message
Tips & tricks for a perfect out-of-office message
Ready to make your out-of-office message shine? Whether heading for the beach or deep into a project, these tips and tricks will help you craft a clear, concise, and professional auto-reply.
1. Make it personal (but professional)
- If your company culture allows, inject a bit of humor or a personal touch to make your message stand out.
- Nevertheless, keep it appropriate. Avoid anything controversial, offensive, or overly personal.
"I'm currently out of the office, exploring the culinary delights of Italy until [end date]. While I'm mastering the art of pasta making, feel free to contact [colleague's name] at [colleague's email] for any urgent matters."
2. Provide the right information
- Clarity is key. Make sure your message clearly states your return date and whether you'll have access to email.
- Alternate contact: Always provide a way for people to get in touch with someone else in your absence, especially for urgent matters.
- Set expectations: Let people know when they can expect a response. Will you reply upon your return, or will it take longer?
3. Formatting tips for visual appeal
- Use bullet points: If you need to provide a ton of information for various scenarios, break up the text into bullets for easier reading.
- Bold key information: Highlight important details like dates and contact information.
- Keep it brief: Avoid long paragraphs.
4. Troubleshooting tips
- Not receiving replies: Check your spam folder to ensure the replies aren't being filtered.
- Message not sending: Confirm you've clicked "OK" or "Save" to activate the message. Double-check dates and times.
- Message not turning off: If you didn't set an end date, disable it manually after your return.
Keep everyone in the loop with out-of-office messages
Whether you're setting up an out-of-office reply in Outlook for the first time or scheduling weeks in advance, it only takes a few minutes to configure automatic replies, block your calendar, and sync your status in Teams. Following the step-by-step instructions in this guide, you can set up your out-of-office message in any version of Outlook (desktop, web, or mobile) so you can fully disconnect while you're away.
Remember, a well-crafted out-of-office message keeps your colleagues and contacts informed while you're away, and it can add a touch of personality or humor to brighten their day.
And if you're managing a team, automating OOO visibility with a tool like Reclaim.ai means less manual coordination and more time focused on the work that matters. Try it free →


