.png)


Zoom has been the go-to virtual communication tool for years, but people can’t join your online meetings without a link. The type of meeting doesn’t matter. What does is making sure people can actually join. That starts with generating and sharing the right Zoom link.
We’ll walk you through how to create a Zoom meeting link on your computer, phone, Google Calendar, or Outlook. You'll also learn how to set up recurring or permanent links, share them safely, and handle any hiccups that come up along the way.
📚 Table of contents
- Requirements before you start
- In the web portal
- In the Zoom desktop app
- In the mobile app (iOS & Android)
- In Google Calendar
- In Microsoft Outlook
- Make a permanent or recurring Zoom link
- Share, copy, and embed your Zoom link
- Security for your meeting link
- Fix a broken Zoom link
- Use Reclaim.ai to automate Zoom scheduling
Requirements before you start
Before you create your Zoom meeting link, make sure you have the following ready:
- A Zoom account – You’ll need to sign in with a free or paid account at zoom.us (Zoom web portal) or in the mobile or desktop Zoom app.
- Host or co-host permissions – Only users with host-level access can create meeting links.
- Stable internet connection – Make sure your internet connection is strong and stable to prevent issues while setting up your meeting.
- Correct time zone – Zoom auto-schedules based on your device’s local time. Double-check it before setting the meeting.
💡 If you're using a work account, your organization may have custom Zoom settings or restrictions. Check with your admin if you don’t see certain options.
Create a Zoom link in the web portal
One of the easiest ways to create a Zoom meeting link is through your default web browser. You can do this on any browser without needing to download the Zoom app first.
Here’s how to set it up:
- Go to zoom.us and click Sign In in the top-right corner.
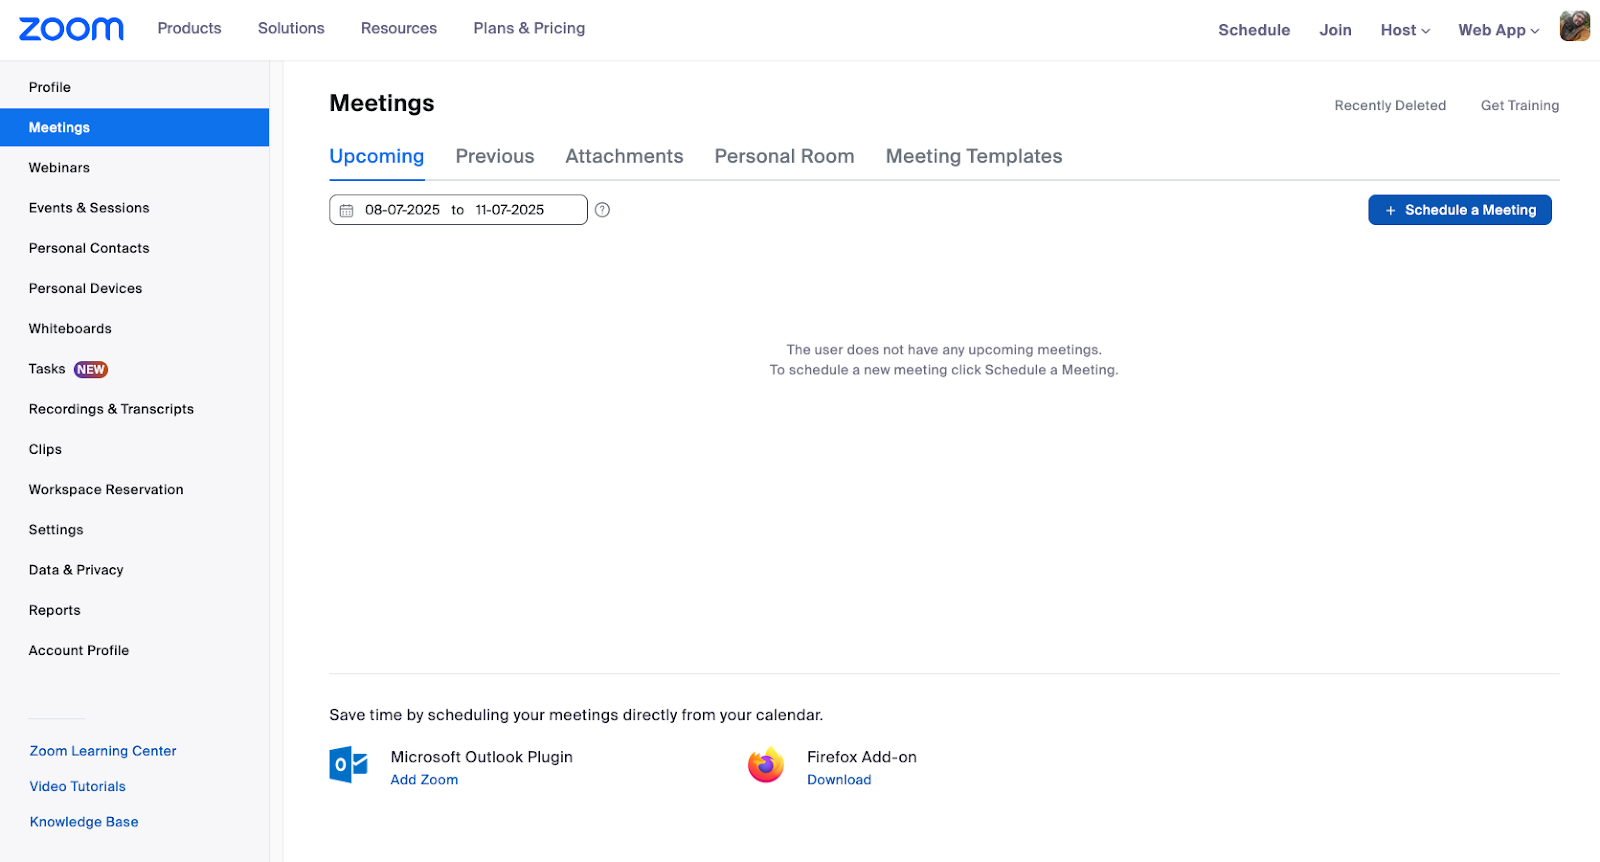
- Once logged in, click Meetings in the left sidebar.
- Select the Schedule a Meeting button.
- Fill in your meeting details:
- Topic: Name your meeting (e.g., “Weekly Check-In”).
- Description (optional): Add context for your attendees.
- When: Set the date, time, and duration.
- Time Zone: Double-check that it’s correct.
- Recurring Meeting: Enable this if you want to reuse the link.
- Under Meeting ID, choose:
- Generate Automatically (recommended for one-time meetings), or
- Personal Meeting ID (for recurring or personal meetings).
- Under Security, leave the default Passcode and Waiting Room settings enabled for privacy.
- Configure any advanced settings as needed, such as:
- Allow participants to join before the host
- Mute participants on entry
- Automatically record a meeting
- Click Save.
After saving, you’ll be taken to a confirmation page:
- Click Copy Invitation to get the full meeting info (link + dial-in options).
- Or, click Copy Link to just grab the meeting URL.
📋 Now you’re ready to paste your unique meeting link into an email, calendar invite, Slack message, or wherever to invite participants.
🔐 Anyone with the link can join unless security settings are enabled. Keep your link private if needed.
Create a Zoom link in the Zoom desktop app
Got the Zoom desktop app (either in Windows or macOS)? You can set up and share a meeting link right from there. There's no need to open your browser. It’s a fast, handy option if you use Zoom a lot.
Here's how to do it:
- Open the Zoom desktop app and sign in to your account.
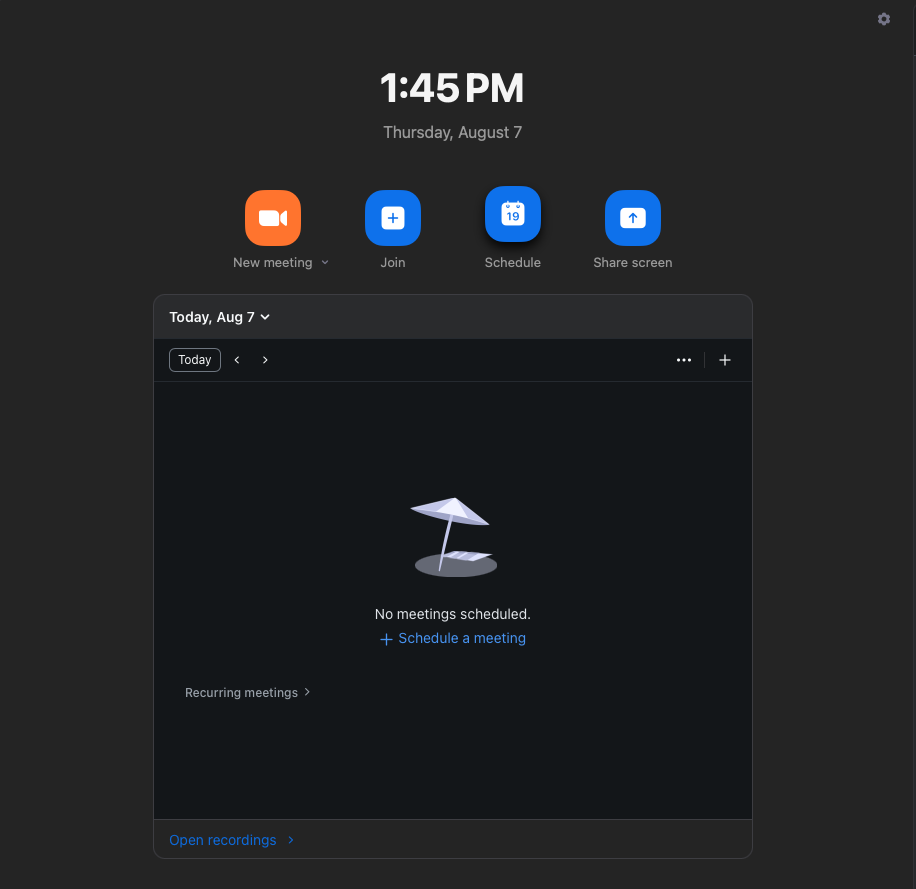
- From the home screen, click the Schedule button (calendar icon).
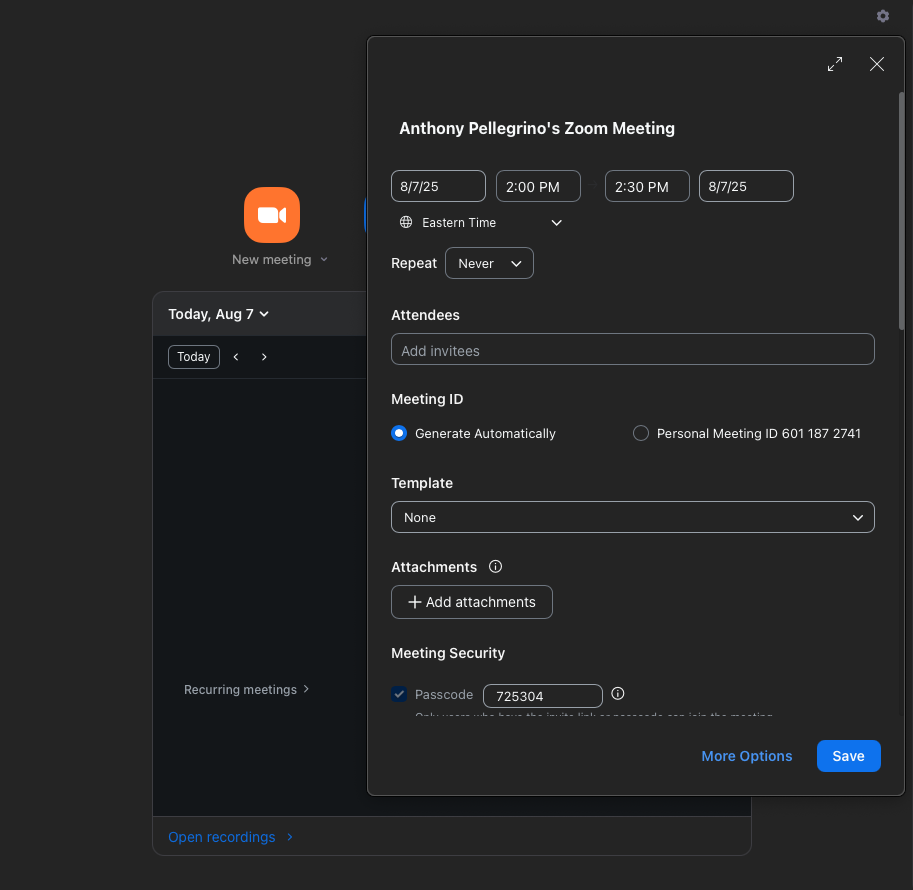
- In the scheduling window, fill in your meeting details:
- Topic: Give your meeting a clear name.
- Start time & duration: Set the date, time, and length.
- Time zone: Make sure it's accurate.
- Recurring meeting: Check this if you want a reusable link.
- Under Meeting ID, choose:
- Generate Automatically (best for most meetings), or
- Personal Meeting ID (if you want to use your personal link).
- Under Security, make sure:
- Passcode is enabled.
- Waiting Room is enabled (recommended for privacy).
- Under Calendar, choose where you want the meeting to be added:
- Outlook, Google Calendar, or Other Calendars.
- Click Save.
Depending on your calendar selection:
- A new window will open in your selected calendar app with the Zoom link pre-filled.
- If you choose "Other Calendars," a summary window will appear with a Copy to Clipboard button to grab the full invitation.
💡 If you need the link later, go to the Meetings tab in the app and click on the scheduled meeting to copy the invitation again.
Create a Zoom link in the mobile app (iOS & Android)
On the move but need to set up a Zoom meeting? With the mobile app for iOS and Android, you can create and share a link in just a few taps.
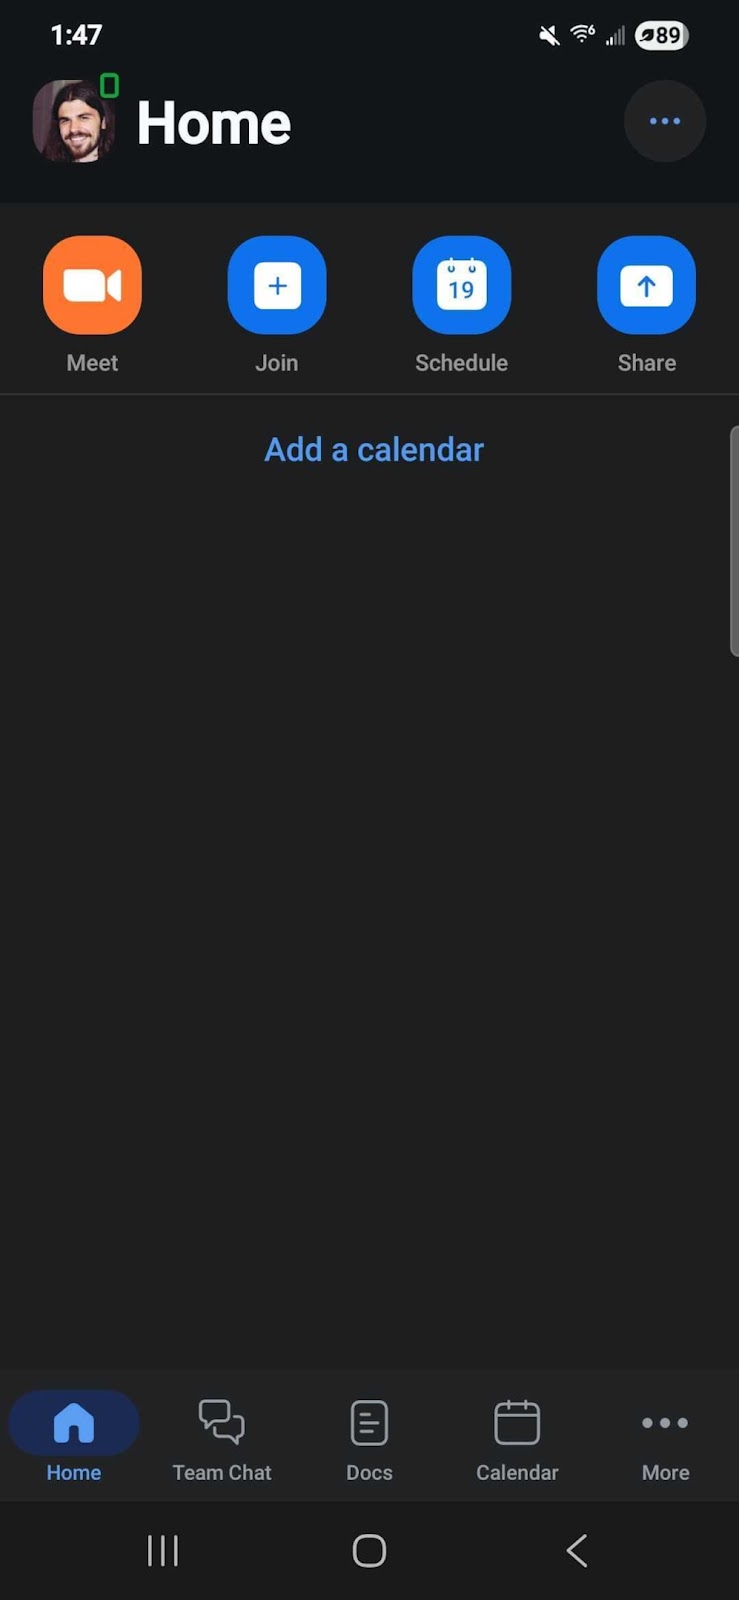
Here’s how to do it:
- Open the Zoom app on your mobile device and sign in.
- Tap Schedule (calendar icon on the Home screen).
- Enter your meeting details:
- Topic: Title of the meeting.
- Start time and duration: Choose when it starts and how long it will run.
- Time Zone: Double-check it matches your location.
- Recurring meeting: Enable this if you want a reusable link.
- Under Meeting Options, check your preferences:
- Passcode (on by default)
- Waiting Room
- Join before the host
- Auto-recording (optional)
- Tap Done (iOS) or Save (Android).
Once scheduled:
- You’ll be taken to the event details screen, where you can tap Add Invitees to send the link via email, text, or another app.
- Or, tap Copy to Clipboard to grab the meeting link and paste it wherever you like.
🔗 You can also access and copy your link later by tapping Meetings from the bottom menu and selecting your scheduled meeting.
📱 This method is ideal when you’re away from your desk or managing meetings from your phone.
Add a Zoom link via Google Calendar
If you’re already using Google Calendar to manage your day, adding a Zoom link is super easy. You can do it right from your calendar without switching apps.
Google Calendar (via Zoom for Google Workspace add-on)
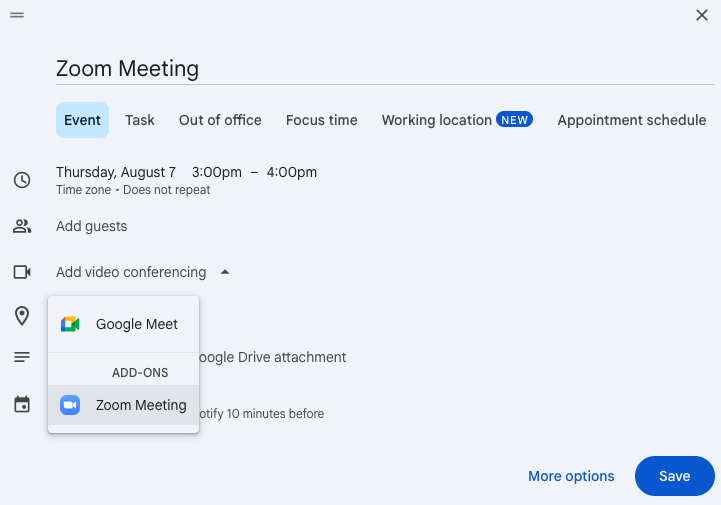
- Open Google Calendar.
- Click Create to make a new event.
- Click Add video conferencing, then choose Zoom Meeting.
- If you haven’t installed the Zoom add-on yet, you’ll be prompted to do so.
- Sign in to Zoom when prompted and authorize the add-on.
- Once added, the Zoom meeting link will appear in the event description automatically.
- Fill out the rest of your event details and click Save.
- Click Send to share the Zoom invitation link with guests. The Zoom link is included automatically.
💡You can set Zoom as your default video conferencing option in Calendar settings to save time.
Add a Zoom link via Microsoft Outlook
In a similar vein as you can with Google Calendar, you can also create Zoom meetings links from your Microsoft Outlook calendar.
Before you begin, you’ll first need to install the Zoom for Outlook add-in:
Outlook desktop (Windows/macOS):
- Open Outlook and go to the Home tab
- Click Get Add-ins (or More Apps > Add apps in new Outlook)
- Search for Zoom for Outlook → click Add
- Open Calendar, create/edit an event → click Add a Zoom Meeting from the ribbon or Apps menu
Outlook on the web:
- Go to https://outlook.office.com and sign in
- Open Calendar → click New Event → then More options
- Click More Apps > Add apps (or Get Add-ins)
- Search for Zoom for Outlook → click Add
- Use Zoom from the ribbon or Apps icon when creating/editing events
Outlook mobile app:
- Open the Outlook app → tap your profile icon → go to Settings
- Scroll to Add-ins → find Zoom → tap the + icon to add it
Microsoft Outlook (via Zoom add-in)
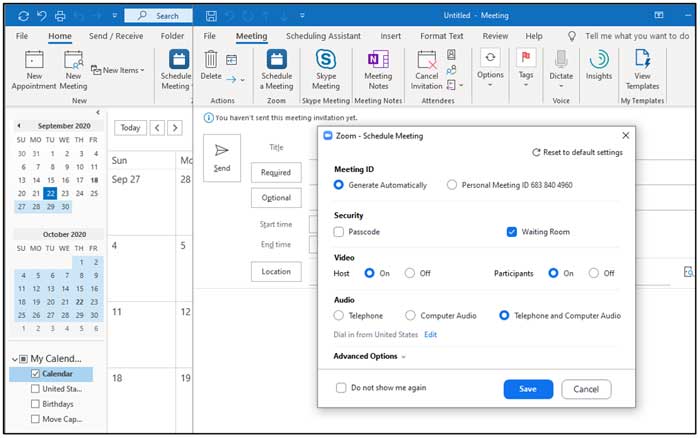
On the Outlook desktop app:
- Open Outlook and start a new calendar event.
- Click the Zoom button in the top toolbar.
- Select Add a Zoom Meeting.
- Sign in and authorize Zoom if prompted.
- The Zoom link and dial-in information will be inserted into the body of the invite.
- Finalize your event details and click Send.
On Outlook web (Office 365):
- Create a new event in your Outlook calendar.
- Click the Zoom icon (if installed) and choose Add a Zoom Meeting.
- Log in and authorize if needed.
- Zoom link is automatically added to the event description.
🔒 The meeting settings (like passcode and waiting room) will follow your default Zoom account settings, even if scheduled from your calendar.
Make a permanent or recurring Zoom link
If you’re meeting with the same group regularly, like for weekly team calls, classes, or office hours, there’s no need to set up a new Zoom link each time. You can instead use either a recurring meeting or your Personal Meeting ID (PMI) to generate a link that stays the same.
1. Create a recurring Zoom meeting
- Open the Zoom web portal, desktop app, or mobile app.
- Go to Schedule a Meeting.
- Check the box for Recurring meeting.
- Choose the recurrence pattern (daily, weekly, monthly, or no fixed time).
- Click or tap Save.
Zoom will generate a single link you can use for all occurrences of the meeting.
✅ Best for: Team syncs, client check-ins, recurring workshops.
2. Use your personal meeting ID (PMI)
Your Personal Meeting ID is a fixed Zoom link tied to your account. It never changes unless you manually reset it.
Here’s how to enable and customize your PMI:
- Go to your Zoom Profile Settings.
- Under Personal Meeting ID, click Edit.
- Check the box for Use this ID for instant meetings if you want to make it your default.
- (Optional) Customize your PMI link to include your name or branding.
- Click Save Changes.
Your personal Zoom link will look something like:
Share, copy, and embed your Zoom link
Once your Zoom meeting is set up, it’s time to get the meeting invitation to your participants. Luckily, Zoom makes it easy to get your meeting link out there. You can email it, add it to a calendar invite, post it online; whatever works best for your group.
Copying your Zoom link
You can find and copy your Zoom meeting link in several places:
- Right after scheduling: Click Copy Invitation or Copy Link on the confirmation screen.
- Zoom desktop app: Go to the Meetings tab, select your scheduled meeting, and click Copy Invitation.
- Zoom mobile app: Tap Meetings, select your meeting, and tap Add Invitees → Copy to Clipboard.
- Zoom web portal: Under Meetings, select the upcoming meeting and click Copy Invitation.
Once copied, you can paste the link anywhere you want.
Sharing the link
Here are some easy ways to get your Zoom link into the right hands:
- Email invitation: Paste the link in the body of the message or use Zoom’s built-in invite templates.
- Calendar event: If you used Google Calendar or Outlook, the link is already included. Otherwise, paste it manually.
- Team chat tools: Copy invite link and send via Slack, Microsoft Teams, or your internal messaging system.
- SMS or messaging apps: Paste the link into iMessage, WhatsApp, Telegram, or Signal.
Just remember that anyone who has the link can attempt to join the meeting unless security features are in place.
Embedding the link online
Want to include a Zoom link on your website, blog, or event page? Here’s how:
- Hyperlink text like: “🔗 Join the Zoom Meeting”
- Add a CTA button using HTML with the Zoom link as the href
- Generate a QR code with a free tool like qr-code-generator.com and print or share it for attendees to scan
Your Zoom link is now ready to go. Just make sure it reaches the right people in the right way.
Security best practices for your meeting link
Without the right settings, anyone with your invitation details could potentially join your call, disrupt your meeting, or gain access to sensitive information.
Want to keep your Zoom meetings safe and private? Here’s what you can do to lock things down:
- Always use a passcode: Zoom adds a passcode by default. Leave it on to prevent unauthorized access. If you’re sharing your link publicly, consider removing the passcode from the URL and sending it separately.
- Enable the Waiting Room: Screen meeting participants before they join. It’s perfect for interviews, webinars, or client calls. You can also customize the message they see while waiting.
- Only allow authenticated users: For internal meetings, require sign-in with an approved Zoom account. Set this under Meeting Options and pick the right domain or profile (e.g., yourcompany.com).
- Use random meeting IDs for public events: Skip your Personal Meeting ID (PMI) for events that get shared widely. Choose "Generate Automatically" to keep links private and limit repeat access.
- Disable “Join before host”: Prevent attendees from entering the meeting early or chatting before you arrive. Combine with the Waiting Room for more control.
- Control screen sharing & chat access: Set screen sharing to "Host only" and limit chat, especially in large meetings. You can adjust these per meeting or at the account level.
- Remove or report unwanted participants: Use the Participants panel to remove or put users on hold. If needed, use "Suspend participant activities" to immediately shut down all sharing and communication.
Security checklist before sending your link
How to fix a broken Zoom link
Sometimes, even when everything seems right, your Zoom meeting link doesn’t work as expected. If people are having trouble joining your Zoom or you're getting strange error messages, don’t worry! These quick fixes can help you sort things out.
Common Zoom link issues & fixes
Use Reclaim.ai to automate Zoom meeting scheduling
Tired of manually setting up Zoom links for every meeting? Reclaim.ai takes care of it for you. It's perfect for things like recurring 1:1s, team check-ins, and focus blocks.

What is Reclaim.ai?
Reclaim is a smart calendar tool that automatically finds the best times for focus time, meetings, habits, and tasks directly in your Google Calendar and Microsoft Outlook Calendar (and with Zoom).
When connected, you can add Zoom links to your Smart 1:1s or Scheduling Links so you don't need to worry about sending links back and forth or updating a link.
How the Zoom integration works
Once you’ve connected your Zoom account to Reclaim:
- Every meeting booked with Smart 1:1s or Scheduling Links can have a unique Zoom link created automatically.
- The link is added to the calendar event so both you and your attendees can join with one click.
- You maintain full control of meeting security settings (waiting room, passcodes, etc.) through your Zoom account.
Why use Reclaim for Zoom scheduling?
- ⏱️ Save time by automating link creation and scheduling.
- 💬 Avoid back-and-forth by letting Reclaim find ideal times across both calendars.
- 🧠 Reduce context switching with better meeting placement that protects your focus time.
- 🔁 Reclaim recurring events (like weekly 1:1s) update automatically when conflicts arise, and the Zoom link always stays attached.
🔗 Try it out: Sign up for free at Reclaim.ai
Productivity Trends Reports