


If you're anything like us, then you have to send lots of emails. Maybe so many that you set up a dedicated habit for it. We can see you now: burning down that inbox, sending replies this way and that. But, sometimes, you might not want all these replies sent immediately.
Luckily, Outlook has a handy feature that lets you delay delivery of specific emails. Now, emails will arrive at a custom time – be it during their busy workday or saved for the calm of a weekday morning. Scheduling emails in advance helps you stay focused on what you’re working on without the stress of sending them right away. It also guarantees your messages go out on time, so you won’t miss deadlines or forget to send something important.
This guide will walk you through how to schedule emails in Outlook:
How to schedule send in Outlook Classic
If you're still using Outlook Classic, here's how you can schedule send:
-
Compose your email as usual. Draft your message, including recipients, subject line, and body content.
-
Click the "Options" tab. This tab is typically located near the top of the email window.

-
In the "Delivery options" section, check the "Do not deliver before" box. This will enable the scheduling feature.
-
Select the desired date & time for delivery. Use the calendar and time drop-down menus to specify when you want the email sent.

-
Click "Send." Once you've set the delivery time, click the "Send" button. The email will be saved in your Outbox and sent automatically at the scheduled time.
How to schedule send in New Outlook
If, however, you've updated to the New Outlook, this process may look a little different (it's even easier):
-
Compose your email as usual. Draft your message, including recipients, subject line, and body content.
-
Click the "Send" dropdown arrow. This arrow is usually located next to the "Send" button.

-
Select "Schedule send." This option will open a scheduling window.
-
Select the desired date & time for delivery. Use the calendar and time selection options within the window to specify when you want the email to be sent.

-
Click "Send." Once you've set the delivery time, click "Send" to save the scheduled message and schedule it for delivery.
How to schedule send in Outlook on the Web
If you use, the browser version of Outlook, schedule send works virtually in the same way:
-
Compose your email as usual. Draft your message, including recipients, subject line, and body content.
-
Click the "Send" dropdown arrow. This arrow is located next to the "Send" button.

-
Select "Schedule send." This option will open a scheduling window.
-
Select the desired date & time for delivery. Use the calendar and time selection options within the window to specify when you want the email to be sent.

-
Click "Send." Once you've set the delivery time, click "Send" to save the email and schedule it for delivery.
Managing your scheduled emails in Outlook
Once you've scheduled your emails, you should know how to manage them. Here's how to view, edit, or cancel scheduled emails in each version of Outlook:
Classic Outlook:
- To view scheduled emails, navigate to your "Outbox" folder. Scheduled emails will be listed there, indicated by the delivery time you specified.
- To edit or cancel a scheduled email:
- Double-click the email to open it.
- In the "Delivery options" section, uncheck the "Do not deliver before" box. From there, you can delete the email.
- To change the delivery time, re-check the box and select a new date and time.
New Outlook:
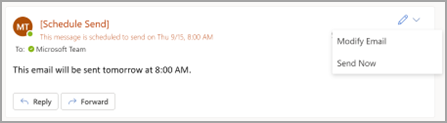
- To view scheduled emails, go to the "Drafts" folder. Scheduled emails will appear with a label indicating their scheduled delivery time.
- To edit or cancel a scheduled email:
- Right-click on the email and select "Edit."
- In the "Deliver Later" window, you can change the delivery time or cancel the scheduling by clicking "Send Now."
Outlook on the Web:
- To view scheduled emails on web Outlook, go to the "Drafts" folder. Scheduled emails will be displayed with a label indicating their scheduled delivery time.
- To edit or cancel a scheduled email:
- Hover over the email and click the three dots (...) to open the options menu.
- Select "Edit" to modify the delivery time or "Send Now" to send the email immediately.
Troubleshooting any potential problems
While scheduling emails in Outlook is generally straightforward, you may occasionally encounter some minor issues. Here are a few potential problems and troubleshooting tips:
1. Time zone differences
If you're scheduling emails for recipients in different time zones, make sure that the delivery time reflects their local time.
Tips:
- Double-check the time zone settings in your Outlook calendar and consider using time zone converters to accurately schedule emails for recipients in different locations.
2. Delivery failures
Scheduled emails may occasionally fail to deliver due to various reasons, such as recipient mailbox issues, network problems, or server errors.
Tips:
- Review the delivery status notifications in your Sent Items folder for any error messages.
- Verify the recipient's email address for accuracy.
- Check your internet connection to confirm a stable connection.
- If the issue persists, contact your IT support or Outlook customer support for assistance.
Schedule your emails in Outlook 📧
Schedule send in Outlook email is a simple yet powerful way to boost productivity and stay on top of your communication game. It lets you send messages at just the right time, avoid unnecessary interruptions, and make sure your emails land exactly when they’re needed.Take some time to explore the scheduling features in Outlook and experiment with different delivery times. It’s all about finding what works best for you and the people you’re communicating with. Before long, you’ll be a pro at timing your emails perfectly and keeping your workflow smooth and efficient.
Productivity Trends Reports
AI calendar for
work & life
Auto-schedule focus time, meetings, & breaks.
Create your free account →CONNECT YOUR CALENDAR